T
 You don’t know how many times people—friends, colleagues, my mother—have all told me, “Oh, that sounds easy. I can do that!”
But when given our transcription test, they don’t even attempt it after experiencing just how difficult (and extremely time-consuming) transcription can be.
In fact, transcribing a 1-hour recorded interview can take, on average, between 3 and 12 working hours. (More on that later.)
So remember to weigh the value of your time when deciding whether to do your own research and academic interview transcription, or whether to hire a specialist.
This post will help you decide whether to type up your own interviews, pulling back the curtain on what you’re getting into if you do.
We’ll cover transcription styles, transcription templates, transcription software, and even guidance on managing unique situations you might encounter while doing the work.
Let’s get after it.
Table of Contents
- 4 Common Transcription Methods: Human vs. Automated
- Step 1: Choose a Transcription Style: How much to include?
- Step 2: Connect Transcription Software & Tools
- Step 3: Spot-Check the Audio
- Step 4: Define Project Specs
- Step 5: Decide How to Handle Indecipherables
- Step 6: Choose a Template
- Step 7: Hacks to Boost Transcript Accuracy
- Step 8: Hacks to Transcribe Faster with Ease
- Step 9: Do a Spelling AND Grammar Check
- Step 10: Edit (& Proof to Audio, if Needed)
- BONUS: Frequently Asked Questions on Handling Special Scenarios
4 Common Transcription Methods: Human vs. Automated
It’s a high-tech world now. There are several ways to convert a voice recording to a Word document in 2020. The method you choose depends on:
- the time you can allot to transcript “clean-up,”
- the complexity of your audio,
- the experience you have with transcription,
- how many WPM you type,
- whether you have the right tools,
- your total available budget (contrasted with available time),
…and a number of other factors.
Available transcription methods to-date include:
Method 1: Automated Transcription
Pros:
Can be a cost-effective option when you have more time than money. Some services can produce transcripts in minutes. Many offer free trials. Removes the need to deal with any humans (unless there’s an issue).
Cons:
Can be quite inaccurate. Depending on your WPM, it may be faster to transcribe from scratch than to edit an inaccurate, A.I.-produced transcript. Has severe accuracy problems with more complex audio (background noise, accents, fast speakers, multiple speakers, etc.). Requires your comfort with technology.
Since we started offering executive-level transcription in 2009, a lot of A.I. options have cropped up. The overall opinion seems to be that A.I. options aren’t sufficiently high-quality for research or academic transcription, where accuracy is paramount and little time is available for clean-up.
So, many researchers and academic professionals choose to pay a bit more and hire out.
Automated transcription might best if your budget is much less, by comparison, than the amount of time you can spend producing interview transcripts.
For instance, a dissertation requires an incredible amount of work, focus, dedication, and time. That’s why many of our clients, students and professors alike, choose to go the “human” route to reserve precious hours wherever they can.
When we started our research and academic transcription company, the only automated option in those days was a downloadable software application called Dragon Naturally Speaking. The consensus was that it was a complete and total disaster in terms of accuracy. Even still, to see if I could save even a few minutes over transcribing some audio files myself, I tried it out. And what a debacle.
Today, DNS claims “99%” accuracy… but so do almost all transcription companies you’ll find. These days, “99%” is on par with calling one’s company “the best,” “premium,” or “top” — a mere superlative that means nothing to the actual product produced. (The sad fact is that those companies publish no measures as to how they determine accuracy percentage… but that’s another story.)
These days, many more automated options have cropped up. Some of the more popular A.I. transcription services and software include Trint, Temi, Sonix, and Scribie, to name a few.
A.I. is definitely worth a shot if you have the time to experiment. You might find a service perfect for your needs.
Many automated transcription services feature a side-by-side editing window now, so you can proof the automated transcript to audio and edit it easily in real-time, right as you’re catching the errors or omissions made by A.I.
On that, if you choose this route, be prepared to spend a good amount of time editing. The most common types of edits automated transcription users report having to make are:
- inserting punctuation,
- inserting paragraph breaks,
- fixing capitalization,
- fixing grammar, and
- correcting obscure terminology.
The above is particularly true if you’ll use your transcript in a professional setting, like quoting it in research, sharing with a professor, or publishing it in the media.
For this reason, depending on your typing speed, it might actually be faster to transcribe the interviews yourself. (Many experienced transcriptionists find it MUCH faster to transcribe from scratch than to edit a low-quality document.)
So if you need an easily-readable, professional quality transcript from the get-go and you’re short on time, automated transcription probably shouldn’t be your first choice.
Method 2: Finding a Freelancer
Pros:
Costs less than hiring a professional transcription company. Guaranteed to work with the same person on every project. Very experienced providers, while more costly, are often extremely fast and thorough, providing professional quality for lower prices than transcription companies.
Cons:
May be difficult to find a freelancer specializing in a particular area (i.e., research and academic transcription). They may go missing anytime (acquired a FT job, got sick, lost interest, etc.), leaving you scrambling for another regular, go-to provider. Very difficult to gauge quality before hire, even those providers with high reviews. Freelancers may forget or disregard your continued requests for certain formatting or privacy requirements. Restricted to working with the same person for every project. Freelancer may not have solid security protocols.
If you don’t have the budget to hire a professional transcription service and you need more accuracy than automated services provide, you might consider a freelance transcriber.
First, a warning:
We have tested literally HUNDREDS UPON HUNDREDS of transcribers across more than a decade.
From brand new “virtual admins” who recently decided to start working online, to 20-year-plus, full-time transcribers, to 5-star (out of 5) rated online transcribers with pages of glowing reviews, the vast majority of those have dismally failed our accuracy tests. (Ironically, the applicants with decades of offline transcription experience often did the worst!)
We estimate that perhaps 5 to 10% of freelance transcribers have passed our tests. And only about 5% of those went on to provide on-time, highly-accurate work consistently.
Your standards may be different than ours, particularly depending on how you’ll use the transcript. But I’d be remiss if I didn’t share that before recommending this option.
I also strongly caution you against using a freelance site like Fiverr to find a transcriber. They seem to have acquired a reputation of having notoriously flaky, low-quality, uncommunicative or even indecipherable workers, despite the worker’s pricing and/or reviews.
But why?
I believe it’s because the barrier to entry in this field is so low. Just as it’s super-simple to take a course and call yourself a “social media marketer” and not really know what you’re doing, it’s just as easy and affordable to get started as a transcriptionist.
That’s not to say that there aren’t reliable, focused, dedicated transcribers out there whose jobs mean the world to them. There are! We’re been fortunate enough to have found and hired many of these devoted, hardworking, driven perfectionists.
I will say that although I don’t personally know anyone who’s used a Fiverr transcriber, this option could very well end up being a practical step up from automated transcription, in terms of quality.
So if you’d like to at least see what’s out there, you can check out Fiverr’s transcription category.
The great news is that you CAN find a dedicated, long-term, top notch freelancer to handle your interview transcription needs for less than you’d typically pay a transcription service. To find one, you might try searching freelance sites like Incluzion (especially important to support in today’s climate!), Freelancer, or Guru.
If you can, always try to choose a transcription provider with a work guarantee.
And in the beginning especially, leave ample time before your deadline to handle edits (or re-hires), in case something goes awry with your initial freelancer of choice.
Method 3: Hiring a Transcription Company
Pros:
Can verify and expect company history and longevity. Highest accuracy, due to more than one set of eyes on your final transcripts (if you choose). Can choose a company that matches your values. May be easier to stimulate your local (city, state, or country’s) economy. Companies have inbuilt fallbacks to protect against missed deadlines or failed projects.
Cons:
Typically requires the highest investment. At larger companies, you may not have a dedicated rep. It may be hard to reach someone “powerful enough” to care about an issue you’ve had / may be hard to get past your assigned rep, the “gatekeeper,” etc. Multiple-hour jobs may take longer than other options.
This is going to be the option requiring the highest investment. But if feasible for you, hiring a transcription company will likely provide the greatest amount of security, both figuratively and literally. It’s the most time-efficient option, particularly if you choose one with a proven track record of providing professional-quality, on-time work.
I’d like to throw our hat in the ring, in that regard.
You are wonderful! Thank you for your immediate response to my email…and it’s Saturday! You continue to amaze me!
And THANK YOU, THANK YOU, THANK YOU for a job well done! You are true professionals! If and when I need more transcriptions made, I will be sure to contact you again!!!
-Meg Crittenden, Ed.D., Assistant Professor
I’ve never been anything but happy with your service. I have a 20-year career in journalism, in 3 different countries… and yours has been consistently the best service I’ve ever used.
-Andrew Shaw, Editor in Chief
Not bad for a family-owned business. If you’d like to know more, you can also check out 12 more reasons to choose Expect Perfection.
Supporting family-owned and independently-owned companies is important to our economy. This is even more true, with the COVID-19 plandemic destroying long-time entrepreneurs’ and employees’ businesses and livelihoods.
But if you’re averse to using a locally-owned or family-owned transcription company — for instance, you foresee needing several hundred hours of transcription per month — then some of the bigger companies with lots of staff and fire power behind them are GMR, Rev, and Allegis.
Method 4: DIY
The fourth common method of interview transcription is DIY, of course. If you’re still entertaining that prospect, we’ll outline how to transcribe interviews yourself with as much speed and as little stress as possible.
You’ll learn how to write a transcript for an interview with speed and accuracy, whether you’re a researcher, professor, journalist, doctoral student, casual typist, or “other.”
Let’s get after it.
Step 1: Choose a Transcription Style
The “transcription style” simply refers to how edited or “cleaned up” you’ll need the conversation and grammar to be in your interviews. For what will you use your documents? This matters a great deal to the style you choose.
The styles Expect Perfection‘s clients use, (and the types of clients that use them), include:
STRICT VERBATIM:
This style includes exactly what the speaker utters, meaning literally every word, partial word, stop, start, and stumble!
This is rarely requested for anyone except certain legal and research transcription clients.
STRICT VERBATIM: MODIFIED:
This style typically includes every word, but no stumbles, stutters, or partial words, and it’s adapted to the specific amount of conversation you’d like left in.
Certain researchers choose this style, as do some legal clients. Video producers also use Strict Verbatim: Modified transcripts in post-production (in conjunction with time coding), to see when on-camera speakers stumble, to quickly access that portion of the video and edit it out.
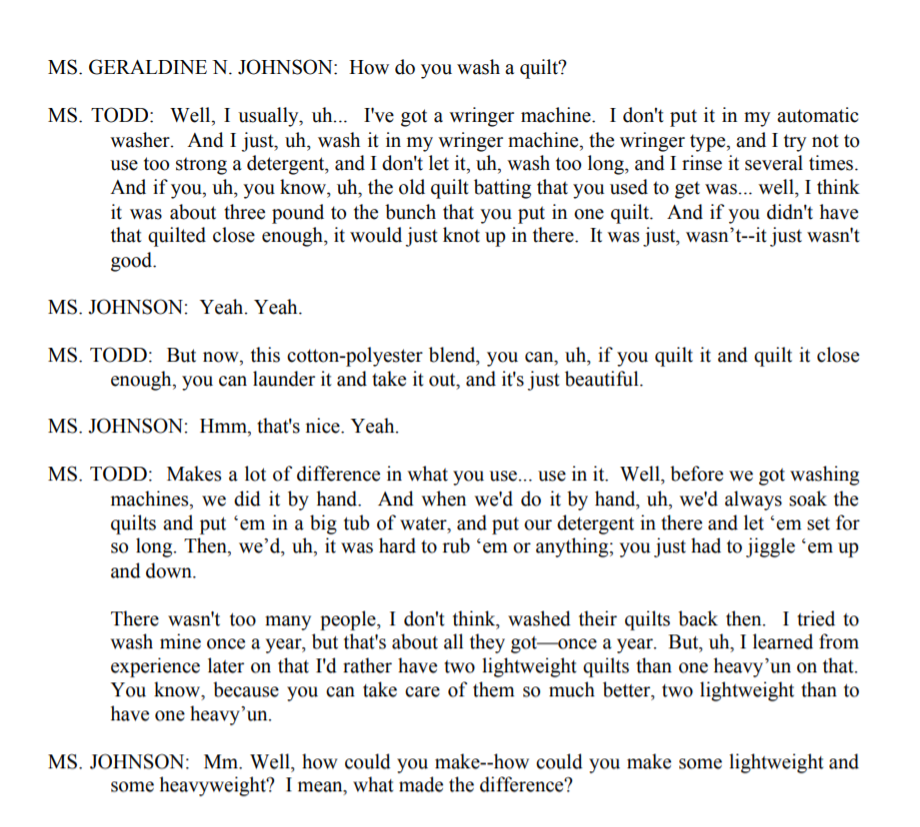
CLEAN VERBATIM:
This is our production standard. This style includes all of the relevant conversation from all speakers, but does not include off-topic conversation, or any stutters or stumbles that would make a transcript hard to read.
It’s considered verbatim because it doesn’t alter the meaning in any way, intelligently capturing the speaker’s original intent, in a clean, clutter-free way. The vast majority of clients — researchers, professors, journalists, video producers, and others — choose this option.
BOOK-LEVEL EDITING FOR CLARITY:
This is also one of the more rare styles, but is requested by clients using transcripts as formal or professionally-published documents, like manuscripts, blog articles, or full novels.
Below are examples of each style. Remember, “Strict Verbatim” will always be exactly what the speaker uttered, errors and all.
Strict Verbatim vs. Strict Verbatim Modified

Clean Verbatim vs. Book-Level Edited for Clarity
Which transcription style should you choose?
The vast majority of our research and academic transcription clients use Clean Verbatim. In almost all cases, you’ll probably want to as well.
To see more transcription style comparisons, check out our other transcript examples.
Step 2: Connect Your Transcription Software & Tools
To produce quality transcripts quickly, you’ll need quality equipment. There is no getting around this. This includes:
- headphones or earbuds
- a foot pedal or hotkeys
- transcription playback software
Headphones/Earbuds:
If you don’t have good headphones or earbuds (for speech, not bass loaded), you’ll produce a transcript with dismal accuracy.
Again, there are no exceptions here.
Note that “good” doesn’t have to mean “costing an arm and a leg.” But I’ve seen far too many transcription tests come in that were complete and total gibberish in places. So many spots were so completely nonsensical that I wondered if they used headphones at all. They replied that they had, in most cases… but I suppose they were completely subpar! Either that, or their transcription test had been faked.
A rookie mistake is to try to transcribe an audio file without headphones at all, only using the device speakers. Please avoid this at all costs.
Even with completely clear, professionally-recorded audio, it’s next to impossible to catch certain words accurately, and in full, through “distant” computer speakers.
But almost miraculously, as soon as you plug that audio directly into your ears, you can decipher exactly what was said.
Foot Pedal:
Although some transcribers swear by their speed and efficiency using hotkeys, we recommend a transcription foot pedal instead, (especially if you’re prepping to produce your very first transcript[s].)
The time you’ll save is immeasurable.
The gold standard of transcription foot pedals is the Infinity 2 USB foot pedal, available for $54.95 on Amazon. It’s a Prime 2-day shipping item with FREE returns. (That’s always nice.)
With transcription hotkeys, you’d control rewind, fast-forward, stop, etc., using the function keys on your keyboard (F2, F3, etc.). But the issue with hotkeys is that it’s easy to hit wrong (hot)keys while typing, which adds extra time to your work.
By contrast, you hardly ever step on the wrong pedal when controlling audio with a foot pedal. And your hands and eyes are completely free to focus on the passage you’re typing.
A pedal is strongly recommended if you plan to do more than 4 to 5 total working hours of transcription. Again, when you’re typing several recorded hours of transcripts, every minute is precious.
You can also get the Infinity USB-2 packaged along with a top-selling transcription software, Express Scribe. (If you don’t have transcription software, you’ll definitely need that anyway.) The bundle sells for $94.95 on Amazon, with free shipping. (Not Prime 2-day shipping, unfortunately.)
Prices do change daily, and numerous times throughout the day, so just check the above links for to-the-minute pricing.
Transcription Software:
Express Scribe has been the recommended transcription software for many years. It’s available for transcribers that use either Windows or Mac, and it supports audio and video files.
File types supported include MP3, WAV, WMA, AIFF, MP2, VOX, DSS, DS2, DSS Pro, and others.
Note, a few reviewers on Amazon said they paid for and downloaded a trial version of the transcription software and weren’t given a registration code. However, those reviews are in a minority. The majority of Amazon’s Express Scribe customers are using it without incident. So either the problem of no code provided was temporary, the customer may have overlooked the code received, or their technical aptitude may have been a bit low.
Currently, on the Express Scribe Amazon page, it states:
This product download includes a product activation code that should be used to activate your software at http://www.nch.com.au/activate/index.html.
This product activation and registration must be done in order for your product to be permanently licensed for use – registration is completed using the File>Register option within the product interface.
Also, if you purchase through Amazon and not via the company directly, you get “Platinum” support for the Express Scribe software. The page states:
To take advantage of the included Platinum technical support and 2 year product upgrade warranty for Amazon customers only, please visit http://www.nchsoftware.com/support/amazonsupport.html
This appears to include phone support from 8A to 5P MST, as well as live chat support, both directly from NCH Software, the creators of Express Scribe.
During my years of transcribing files for both freelance contracts and Expect Perfection, I only remember having to contact Express Scribe twice, and getting a response each time.
I, and what appear to be thousands of other transcriptionists, have found the software easy to use across the past decade or more. Help files are also embedded in the software, making it easy to figure out how to use. Express Scribe walks you through setting up your Infinity USB-2 (or other) foot pedal, as well as configuring its settings, so it’s quick to get started transcribing your first audio (or video) file.
Finally, if you’re starting from scratch and need a headset, the software, and a foot pedal, you can purchase a bundle that includes all three: Express Scribe, the Infinity USB-2 foot pedal, and the Spectra USB transcription headset.
Alternatively, you can also download a free version of Express Scribe that supports limited file types, to ensure it will work for your needs before buying the Pro version. You may not even need Pro, depending on what file types you need to transcribe.
Step 3: Spot-Check the Audio
Great! Now that you’ve got all your tools to enable fast and accurate transcription, it’s time to review your file audio.
Despite what several popular interview transcription guides recommend, we actually do not suggest listening to the entire audio all the way through before transcribing.
Who has that kind of time?
Think about it:
If you have 10 hours of interviews to transcribe, it will already take you between 4 to 12 working hours to transcribe and edit every single hour of audio (or video).
Even at 4 working hours per recorded hour, that’s 40 total working hours of transcription and editing.
Do you want to add another 10 hours just listening to the interviews that you were probably there to record anyway?
Listening to the audio all the way through in advance can be a good idea in a few, very select cases:
- if you weren’t present during the interviews AND you’re unfamiliar with the subject matter;
- if you’re transcribing someone else’s interviews, you’re a brand new transcriber, AND you’re unfamiliar with the subject matter.
Otherwise, we can’t think of many good reasons to potentially spend hours listening to the entire audio before actually getting to work.
Instead, simply “spot check” your audio.
Basically, listen to several seconds of it at various points, from beginning to end. You’re listening for things like:
- spontaneous, unusual background noise (to know to guard your ears when it comes),
- difficult spots (to pay closer attention to as you’re transcribing),
- unfamiliar or complicated terminology (to research in advance, or to add to your terminology shortlist or keyboard shortcuts)
- etc.
Step 4: Define Project Specs
Just as for research, proper preparation speeds the work for transcription, too. To make your transcript as readable and usable as possible, and to avoid time-consuming snags, you’ll need to decide on a few factors before starting to transcribe:
Speaker IDs: How will you identify the speakers throughout your transcript?
What will you call each person that speaks in your recording? Here are some common options:
1. Use the entire first name and title on a speaker’s first comment (ex: DR. H.T. MAJOR), using only title and surname each time thereafter (ex: DR. MAJOR).
2. Use first or last names, with initials, for the other mentions (ex: MARCUS G., or M. GARVEY).
3. Use only the first name or surname (ex: MARCUS, or GARVEY).
4. Use only the first and last initials. Popular for highly-confidential research and academic transcription, or for legal transcription (ex: M.G.).
5. Use INTERVIEWER or INTERVIEWEE. (Also popular for research, academic transcription, or legal transcription.)
Options are endless. Choose the one that best suits the needs of the reader(s) of your interview transcripts.
Another quick note:
You noticed that we capitalized all speaker IDs? This is standard. It helps readers easily identify speaker changes when starting new paragraphs. It’s also standard to follow speaker IDs by a colon and two spaces.
Again, you can review our transcript examples to see this in action.
Transcript timestamps or timecodes: What are they, and are they needed?
Timestamps and time codes can help you refer to portions of your audio or video quickly while reading the transcript. They’re generally enclosed in parentheses or brackets, as hh:mm:ss.
Ex: [01:32:59] They have a number of different uses:
Timestamps correspond with the time counter visible on the audio player. If you plan to pull audio quotes for use in other media, timestamps will make those sound bytes easy to find for your research or publications.
Timecodes correspond with the time counter visible on the video screen while the video is playing. Video production companies use timecoding often in post-production, as we discussed in the Transcription Styles section.
Timestamps and timecodes are generally placed in the left-hand margin of a transcript. You can place them on certain lines of the page, before each new speaker, only next to unintelligible portions, or in any other location you think they’d be useful. (Timestamps/codes for unintelligibles are placed immediately after the unknown word or phrase, and not in the margin.)
Generally three or four per page are more than enough.
Frequent terminology:
Even when transcribing interviews you conducted, it’s useful to have a shortlist of common names, terms, and acronyms alongside. It can also serve as a reminder for the grammar standards you set, such as spacing, capitalization, and even speaker IDs.
This is particularly useful if you have hours of interviews to transcribe across several weeks, or if you’ll be transcribing across several sessions.
Step 5: Handling Indecipherables
Inevitably, for some audios, you’ll come across words you don’t understand. Whether it be an unfamiliar term, or an acronym you weren’t able to reasonably figure out, you’ll need to call it out in some way. Just be sure to choose a standard convention, so you can find them easily later, during the proofing stage.
Some ideas for indecipherable words or phrases are:
- [inaudible]
- [unintelligible]
- [indecipherable]
- [indiscernible]
- Placing the [entire indecipherable phrase in] brackets.
Again, be sure to use the same convention every time, for both your own clarity, and the clarity of the reader.
Another option is using [phonetic].
This is typically placed after a phonetically-spelled proper noun, like a company or person’s name that you couldn’t resolve with research. (This would replace the option listed previously of placing the entire phrase in brackets.)
One other option is using [Crosstalk].
This is used when two or more speakers are talking over one another, making it hard to decipher what either one is saying. We place [Crosstalk] alone on its own line when applicable, not using any speaker IDs.
Step 6: Choose a Template
The template, like the speaker ID standard, must be chosen with your reader in mind.
Your goal is to make your transcript supremely simple for both reading and analysis. So the transcription template shouldn’t be chosen at random.
Note that this document truly is a “template” in every sense of the word; it is not merely a blank Word document. Your template contains filler text and is already formatted to your requirements.
You’ll save A LOT of time using templates for your transcripts, because all you’ll need to do is type, rather than worrying about formatting as you go along, or even once you’re done typing. Instead, the formatting is handled for you in advance.
Some common items your transcription template may include are:
- Name of Event
- Date of Event (may also include time)
- Event Location
- Name of Transcriber
- Reminders of Style Guidelines
- Example Timestamps / Timecodes
- Name of Group/Company/Person for Whom You’re Transcribing (if not you)
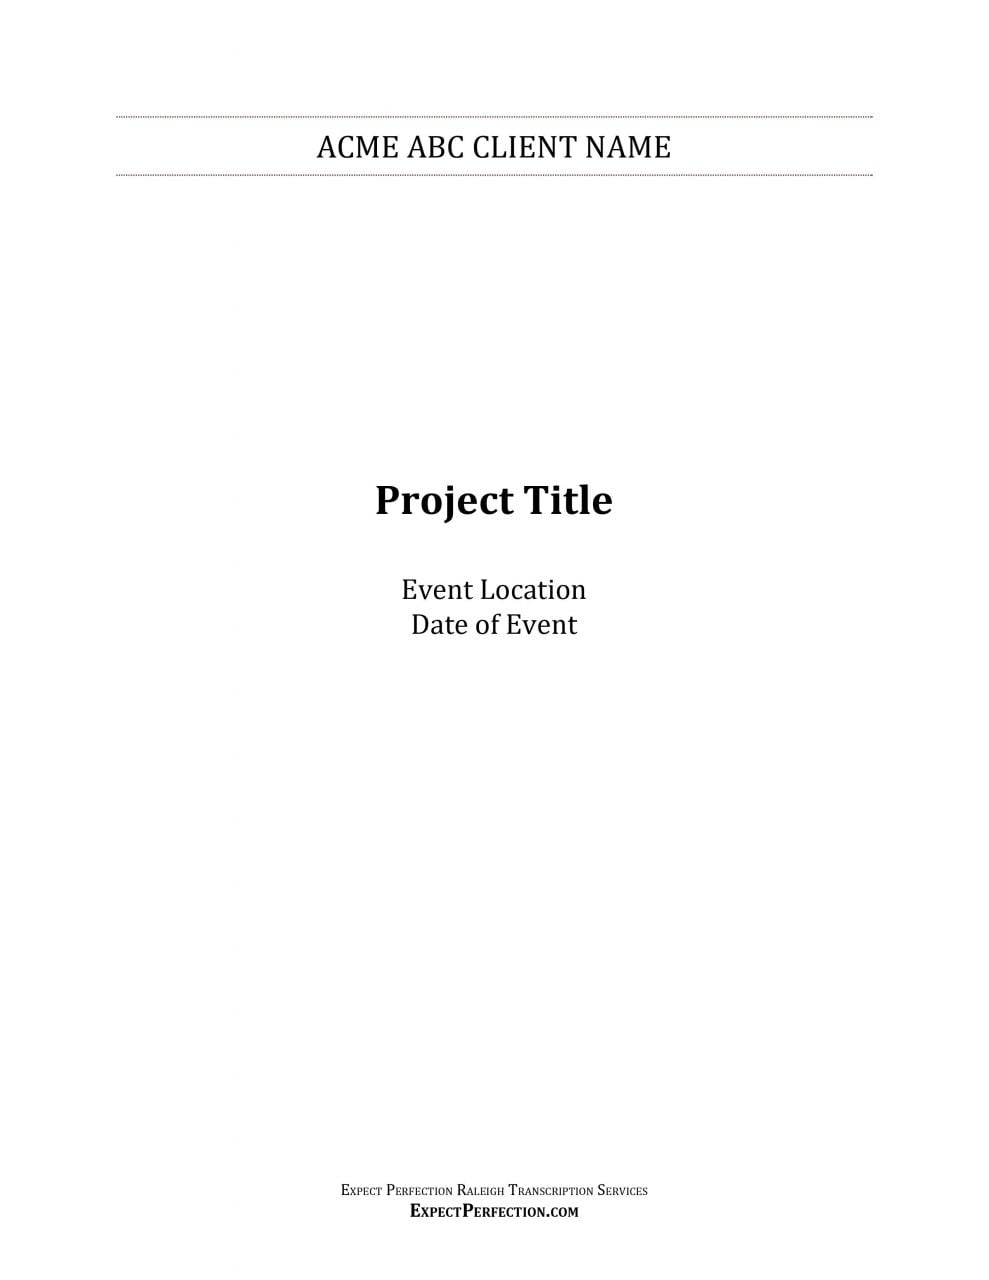
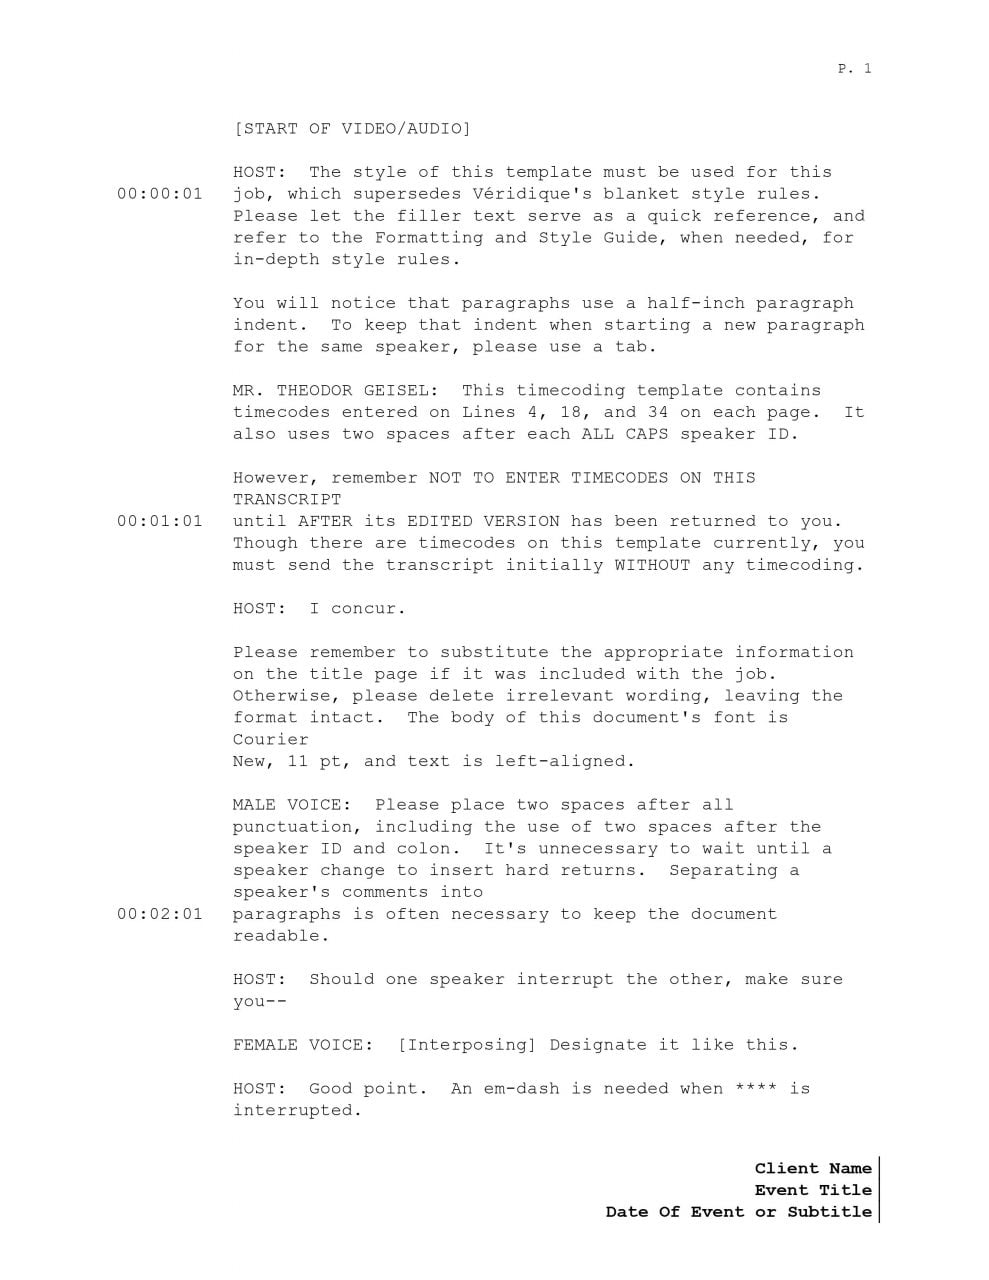
Here’s an example what a cover page and a body page of a transcript template might look like:
Interview Transcription Cover Page
Interview Transcription Body Page
(for timecodes & time stamps)
You can see our templates in use (and download some transcript examples) on our Sample Transcripts page.
In addition to making reading and analysis straightforward, also choose the template that will give YOU the least amount of work.
For example, unless you know some advanced MS Word formatting hacks, you probably won’t want a template with bolded speaker IDs for interviews where the speaker changes often. Then, you’d have to spend extra time formatting (to bold all speaker IDs) once you’re done transcribing.
Step 7: Boosting Transcript Accuracy
There are a few tricks of the trade to ensure your interview transcript is as accurate as possible:
- Research all unfamiliar terms and acronyms immediately.
- Transcribe the recording at 90% speed.
- Timestamp some unintelligibles.
Research all unfamiliar terms and acronyms immediately.
If you’re not 100% sure that a speaker said what you think they said, go to your favorite search engine and research it.
Look up unfamiliar terms right away. Doing so will provide context (and boost accuracy) for the remainder of the transcription.
Also, it’s likely that you’ll find other words and acronyms associated with the one you’ve researched, which will provide even greater knowledge of the subject matter, boosting accuracy too.
Transcribe the recording at 90% speed.
Slowing playback down may seem counterproductive to speedy transcription. But it can actually help you move through your interview transcription faster.
Depending on your typing speed, slowing playback may allow you to transcribe a great deal of the audio in real-time, without a lot of pausing and rewinding.
However, whether this is practical — or whether it makes the speakers sound, instead, like unintelligible monsters — will ultimately depend on how quickly interview participants are speaking.
Timestamp some unintelligibles.
As I’ve described, you’ll inevitably run into indecipherable portions in many transcripts. Although this is a lot more rare with well-recorded interviews, you still want to be able to resolve all indecipherables if possible, and quickly.
Here’s where your timestamp comes in.
The timestamping process itself is yet another time leech when producing transcripts. But they’ll save you time on the back end, being immensely useful for quick reference later.
Even during editing and proofing, they allow you to find any indecipherable portions quickly, to (hopefully) clarify what was said.
You could choose to timestamp every unintelligible, but typically, one per page is more than enough to save you considerable time. (Ex: You could timestamp the beginning of each new page as a point of reference.)
Step 8: Hacks to Transcribe Faster with Ease
In large part, you can only go as fast as your typing and listening abilities will allow you. Be that as it may… I’ve still got a few transcription speed hacks up my sleeve. ;}
In our experience, beginning transcribers spend between 6 and 12 hours transcribing every 1 hour of audio.
By contrast, very experienced transcribers might transcribe that same 1-hour audio in 2.5 to 3 working hours.
But there are a few things you can do to shave a few minutes, or a few hours, off of your working time. Again, with transcription, time literally is money.
Two ways to boost the speed of your transcription work are to:
- Transcribe the recording at 125% playback speed.
- Use autocorrect for commonly used speaker IDs and terminology.
Transcribe the recording at 125% playback speed.
I know we said earlier that, to boost accuracy, you may want to slow playback speed.
And now I’m suggesting to speed it up!
True, speeding up playback can be risky, particularly if you’re unfamiliar with the terminology and/or weren’t present at the interviews. It’s best reserved for audio files with very slow speakers, or for interviews with lots of pauses.
A good rule of thumb is that if you can’t understand every word spoken at a higher speed, or you need to rewind every few seconds, you should probably return playback to its original speed.
Also, there are often portions of the interview where participants begin talking faster, or do a lot of false starts due to excitement, agitation, etc. At these points in the audio, you would bring the speed back down to 100%, so you’re not missing critical dialogue.
The longer you transcribe, the more you get to know your own personal limits (and incorporate more feedback from your readers). Soon, you’ll be able to choose, on the fly, the best playback speed for the situation and your goals.
Use autocorrect for commonly used speaker IDs and terminology.
When I was transcribing, this allowed me to FLY through the transcription of interviews, or even the transcription of other recording types, when the speech was clear.
After transcribing the first few pages in a longer recording, you’ll start to notice patterns.
Ask yourself:
- What terms, names, acronyms, companies, etc., are used often?
- Who are all the speakers in this recording?
- What common words (in this and other recordings) do I always mistype?
- What longer terms can I save time on by transcribing in shorthand?
Set up your autocorrect to transform abbreviations into the full words or speaker IDs, to capitalize acronyms for you, or to fill in any other commonly used words that will help you save time during transcribing.
For example, I would set my autocorrect to transform:
- “biz” into “business”
- “co” into “company”
- “cos” into “companies”
- “int” into “INTERVIEWER: “
- “resp” into “RESPONDENT: “
- “uss” into “United States”
- “US” into “U.S.”
…and so on.
Your personal shorthand codes will take a little getting used to, but the time saved when transcribing starts to pay off quickly!
There is one thing to watch for:
If you accidentally input a typo that happens to be one of your “shorthand codes,” it can make for a zany sentence. But these instances should be quite rare.
And that’s what the editing and proofing stage is for.
Also, please note that the codes above will only autocorrect to other words when they’re followed by a space, or a punctuation mark.
For example, the word “respect” won’t transform into “RESPONDENT: ect,” just like the word “fuss” won’t turn into “fUnited States,” etc.
But if I would type “the uss[comma]“ or “the uss[space],” then the code would transform to “the United States,” etc.
Make sense?
This is a really useful hack that hardly anyone else talks about. The goal is to use every tool you have available to boost your transcription speed without sacrificing accuracy… especially when you’re not a transcriber by profession!
Step 9: Spelling AND Grammar Check
Once your transcript is complete, it’s not enough to do a simple spellcheck.
This is one of the top omissions made by the majority of transcribers.
Some grammar and style checking is imperative to providing a clean, consistent transcript, particularly when you’re transcribing more than one interview.
For instance, you can set the check to always require punctuation inside quotation marks, to ensure that there’s always a comma after the last list item, or to check capitalization at the beginning of sentences.
This, once again, helps you shave time off of the proofing and editing phase of transcription.
Step 10: Edit (& Proof to Audio, if Needed)
Once your interview transcript is complete, it’s time to clean it up to the level you need. You can choose one of three common options:
- Proof the entire transcript to audio.
- Re-read the entire transcript, but proof only the unintelligibles to audio.
- Search the transcript for unintelligibles, and proof only those sections to audio.
Proof the entire transcript to audio.
This basically involves listening to the audio, either at real speed or the highest comfortable speed (i.e., 125 to 150%, depending on rate of speech), and reading the transcript along with it, to catch errors.
If all the speech was easy to understand and you conducted the interview, proofing to audio may be overkill for many researchers.
But when you have not conducted the interview yourself, (or when you’d just like to ensure the highest accuracy possible, particularly as a novice transcriber), proofing to audio helps a great deal.
It does allow you to listen to the interviews with greater understanding and clarity on any unique terminology, or on the subject matter in general.
We strongly suggest proofing to audio if you’ve produced a Strict Verbatim interview transcript, to make doubly sure you’ve included every utterance you intended. Otherwise, the next option may be best.
Re-read the entire transcript, but proof only the unintelligibles to audio.
Instead of listening to the audio over the entire transcript, with this option, you’d fast-forward right to the unintelligibles you timestamped (see what you did there?) and attempt to resolve them.
This option ensures nearly as much accuracy as the previous option, with a lot less time invested.
Although you’re fast-forwarding the audio directly to the indecipherable passages, you’re still reading the entire transcript to ensure everything makes sense. If you transcribed while fatigued, for instance, you’ll almost assuredly find nonsense transcribed a few paragraphs before you began dozing.
Transcribing While Tired–or TWT, to coin a phrase–is firmly on our list of transcription don’ts.
Getting every word exactly as spoken isn’t imperative with most other transcription styles, as long as you’re sure never to change the speaker’s intended meaning. So reading alone, without proofing audio, is often sufficient for Clean Verbatim style, (and often, for Book-Level Editing for Clarity).
With this proofreading option, you’re mostly looking for grammar errors your word processing software didn’t catch, and for content that doesn’t make sense.
For example, if you transcribed an autocorrect code wrongly and didn’t notice it while in the heat of transcription. It can happen to the best of us, but it’s even more likely as a non-pro transcriber. It takes advanced skill to listen closely to dialogue, type it exactly, and “draft proof” your transcription as you’re typing it.)
Multi-task much?
Search the transcript for unintelligibles, and proof only those sections to audio.
If you’re short on time, if you’re very confident in your transcript quality, or if the transcript will only be for your own use, you might only choose to only proof unintelligibles.
If you’ve used consistent conventions, you can search for a left or right bracket — [ or ] — to locate all phonetic spellings, timestamps, and unintelligibles. You’d then re-listen to the audio several times at each of those exact points, in attempts to make out what was said and replace the convention with correct transcription.
BONUS: F.A.Q. on Handling Special Scenarios
In this last section, I wanted to provide some guidance on handling a few special scenarios we’ve seen asked about around the Web.
Some unanswered questions from the IndianScribes transcription guide, Quora, and other sources were:
It’s easiest to name it after the audio or video file, using everything before the file extension.
For example:
InterviewWithMarciaJohnson.mp4 would be named as either InterviewWithMarciaJohnson.docx or InterviewWithMarciaJohnson.doc.
At Expect Perfection though, we generally also add _DRAFT or _FINAL to the file name, depending on the transcription tier a client requests.
For instance, if you choose the Budget Transcription tier, your file would be named InterviewWithMarciaJohnson_DRAFT.doc. With the Premium tier, it would be named InterviewWithMarciaJohnson_FINAL.doc, to indicate that the file has been edited and proofed before provision to you.
FreeAdvice® Legal states that:
Copyright protection is available for original works of authorship fixed in any tangible medium of expression.
We interpret this as follows:
If you own the original content of the audio or video (i.e., the participants have transferred the rights to their contributions to you, and you wrote the interview questions), then you may be able to copyright your transcript.
If you haven’t conducted the interviews or created any of the content (such as the questions), then the work would generally not be eligible for (your) copyright.
But it’s best to get advice from an attorney well-versed in copyright law and describe your unique case.
Body language and other unspoken elements are only included by request, in Strict Verbatim styles.
In Strict Verbatim, if the interviewee makes a gesture that’s important for context, we describe their body language in brackets.
For instance:
INTERVIEWER: Was the babysitter home during the invasion?
INTERVIEWEE: Sure. [Waves hand dismissively.]
This is only possible, obviously, for video transcription where we can see the parties.
In audio recordings, your interviewer might instead consider describing the gesture for the record. In those cases, the transcript might read something like this:
INTERVIEWER: Was the babysitter home during the invasion?
INTERVIEWEE: Sure.
INTERVIEWER: I see that you’re waving your hand, somewhat dismissively. Is there something else you’d like to say about that?
No. You should never transcribe all dialogue as quotations within interview transcripts.
For transcripts containing voice overs, you would transcribe the dialogue as normal. For the voice over, you can use a convention — i.e., [VOICE OVER] — or put it in italics.
For example:
Introducing Chaunte, the Wayans family’s most talented member.
HOST: Great to have you here, Chaunte.
MS. WAYANS: Thank you for having me.
Or:
[VOICE OVER] Introducing Chaunte, the Wayans family’s most talented member.
HOST: Great to have you here, Chaunte.
MS. WAYANS: Thank you for having me.
That depends.
If your goal is to offer a translation of the foreign language into the English language, then it should not be translated verbatim. Foreign languages are almost never translated verbatim. They don’t make sense when translated literally.
For example, English-speakers who’d like to say, “How’s it going?” in Spanish might say, “¿Cómo te va?” But if translated literally, “¿Cómo te va?” means, “How it goes to you?”
Obviously, you would translate this to, “How’s it going?” in English. (Note, translation is beyond the scope of this article.)
If your goal is to include foreign language transcription within an English interview, then it can be transcribed verbatim. (For consistency, you’d typically use the same transcription style you’ve chosen for the remaining English dialogue.)
Example:
INTERVIEWER: How are you, Jay?
INTERVIEWEE: Don’t you mean, “¿Cómo te va?” Just kidding. I’m fine, Jill.
Note, that both foreign language transcription and foreign-to-English language translation should only be attempted if you’re at least conversationally fluent in the foreign language.
If you’re not fluent, you can replace all foreign language with the [foreign] convention.
For example:
INTERVIEWER: How are you, Jay?
INTERVIEWEE: Don’t you mean, [foreign]? Just kidding. I’m fine, Jill.
In Closing
As you’ve seen, there’s a lot to think about when producing interview transcription for audio or video files. We hope this guide has set you up to successfully create high-accuracy transcripts from your media, no matter your experience level.
What questions do you have left about the interview transcription process? Want to share other tips we didn’t list here? Let us know in the comments!